

The Best Way to Caulk Windows: A Step-by-Step Guide for Homeowners
The Best Way to Caulk Windows: A Step-by-Step Guide for Homeowners
Why Drafty Windows Are Costing You More Than You Think
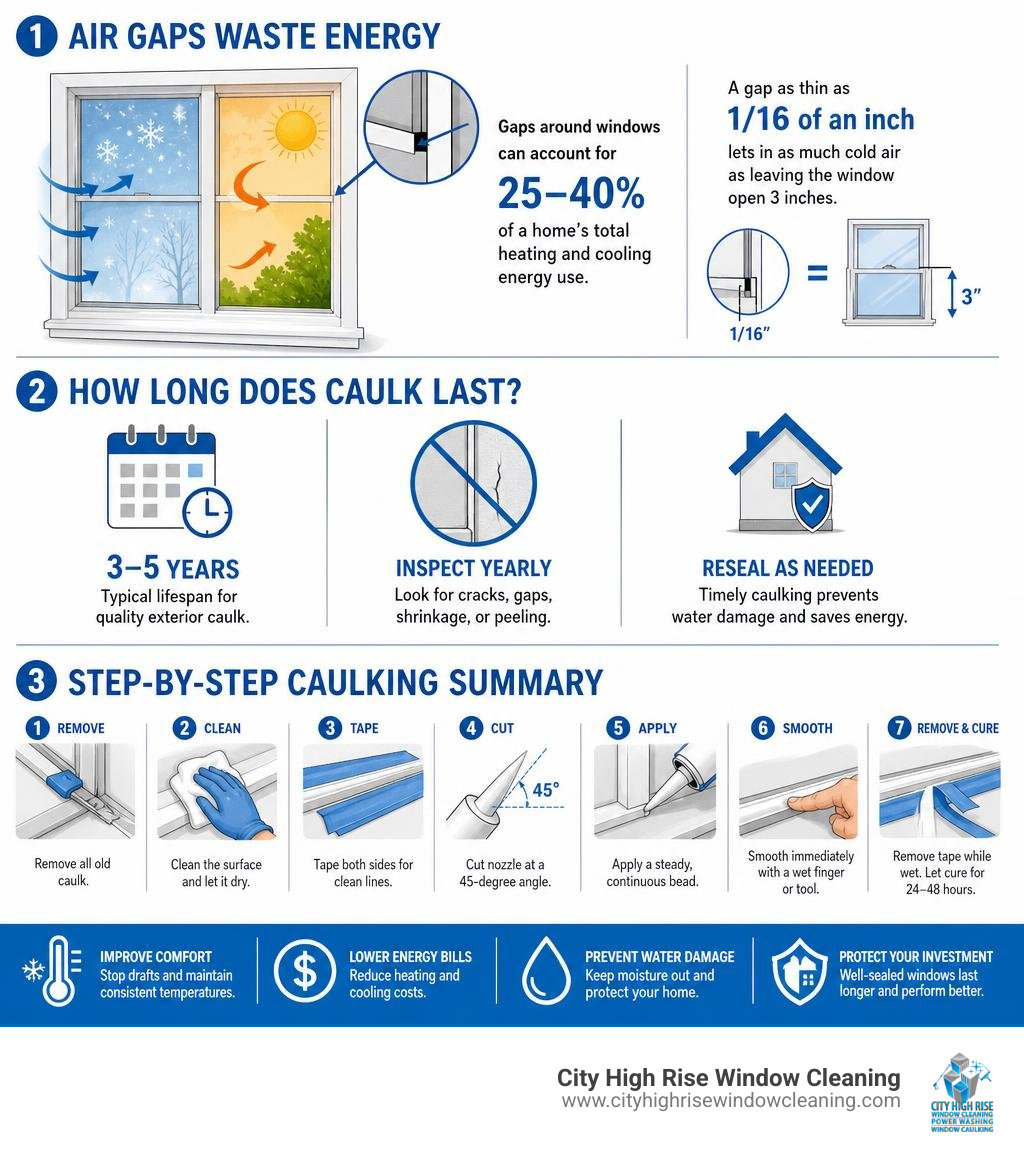
The best way to caulk windows is to remove all old sealant, clean the surface thoroughly, and apply a steady, continuous bead of the right caulk at a 45-degree angle — then smooth it immediately and let it cure for 24 to 48 hours.
Here’s the quick-start process:
- Remove all old caulk with a utility knife or scraper
- Clean the surface with rubbing alcohol and let it dry completely
- Tape both sides of the joint with painter’s tape for clean lines
- Cut the caulk tube nozzle at a 45-degree angle
- Apply a steady, continuous bead along the joint
- Smooth immediately with a wet finger or caulking tool
- Remove tape while the caulk is still wet and allow 24 to 48 hours to cure
That small line of sealant around your windows is doing more work than most homeowners realize. Air leakage through gaps in window frames can account for 25 to 40 percent of a home’s total heating and cooling energy use. A gap as thin as 1/16 of an inch around a standard window frame lets in as much cold air as leaving the window open 3 inches.
And here’s what makes it worse: most failing caulk doesn’t announce itself. You may feel a faint draft on a cold morning, notice your energy bills creeping up, or spot a water stain near the trim — and assume it’s something else entirely.
The good news? For most windows, this is a beginner-level DIY fix that costs under $40 in materials and takes an afternoon. Done right, it can pay for itself within a single heating season.
My name is Brett Hochman, CEO of City High Rise Window Cleaning, and with over 48 years of hands-on experience in exterior building maintenance — including professional high-rise window caulking across New York City, Long Island, New Jersey, and Westchester — I’ve seen how proper sealing protects buildings from water damage, energy loss, and costly structural repairs. In this guide, I’ll walk you through the best way to caulk windows so you get a seal that lasts.
Know your best way to caulk windows terms:
Choosing Your Sealant: Interior vs. Exterior Window Caulking

Before you buy the first tube of sealant you see at your local hardware store in Long Island or Westchester, you need to understand that interior and exterior window sealing are two entirely different jobs. Using the wrong formula is one of the most common reasons DIY caulking fails within the first year.
For exterior windows, your sealant must withstand intense UV rays, freezing winter temperatures, and heavy rain. For interior windows, your priorities are low-VOC emissions, paintability, and easy cleanup.
Let’s break down the three primary types of sealant you’ll encounter when looking for the best way to caulk windows:
- 100% Silicone Caulk: This is the undisputed heavyweight champion for exterior applications, particularly around glass, vinyl, and metal frames. It remains highly flexible for decades, does not shrink, and is completely waterproof. However, it is notoriously difficult to smooth out, cannot be painted over, and requires mineral spirits for cleanup.
- Siliconized Acrylic Latex Caulk: Often referred to as “painter’s caulk,” this hybrid combines the ease of water-based latex with the durability and flexibility of silicone. It is paintable, cleans up easily with soap and water, and is ideal for interior trim. While it can be used outdoors, it typically only lasts 5 to 10 years in the harsh, seasonal climates of New York and New Jersey compared to its 10-to-15-year indoor lifespan.
- Polyurethane Caulk: A heavy-duty, professional-grade material that offers incredible adhesion and handles up to 50% joint movement. It is the go-to choice for sealing window frames against masonry siding like brick, stucco, or stone. The downside? It is highly sticky, difficult to tool, and must be painted over because UV light will eventually degrade it.
To help you choose, I have put together a quick comparison table:
| Caulk Type | Best Use Case | Lifespan (Exterior) | Paintable? | Cleanup Method |
|---|---|---|---|---|
| 100% Silicone | Exterior glass, vinyl, metal | 20 to 50 Years | No | Mineral Spirits |
| Siliconized Latex | Interior trim, drywall-to-frame | 5 to 10 Years | Yes | Soap & Water |
| Polyurethane | Exterior brick, masonry, wood | 10 to 20 Years | Yes (Required) | Solvents |
If you want to dive deeper into selecting the perfect product for your specific window type, check out my articles on Stop the Draft with the Best Calking for Windows and A Pro’s Guide to Applying Calk Around Windows Correctly. For more general advice on sealing drafts, you can read Your windows are leaking air — here’s the fix and the Window Caulking Guide: Best Caulk, Tools, and Application Tips – D and G Flooring.
Essential Tools and Surface Preparation

I will tell you a secret that every professional contractor in New York City knows: prep work is 90% of the job. If you apply the most expensive silicone over dirty, wet, or crumbling old sealant, it will peel away within weeks.
To achieve a clean, professional finish, you need to gather the right tools before you begin.
Your Essential Caulking Toolkit
- A High-Quality Caulking Gun: Skip the $4 plastic models. Invest $10 to $15 in a professional, smooth-rod dripless caulking gun with a thumb-release lever. The thumb release instantly stops the flow of caulk when you let go of the trigger, preventing messy oozing.
- Removal Tools: A sharp utility knife, a stiff putty knife, or a dedicated 3-in-1 caulk removal tool.
- Cleaning Supplies: 90% rubbing alcohol (isopropyl), clean rags, and a stiff-bristled brush.
- Masking Material: High-quality blue painter’s tape.
- Gap Filler: Foam backer rod (essential for filling any gaps wider than 1/4 inch).
How to Prepare the Surface
First, you must remove every trace of the old sealant. Do not try to skip this step! Caulking over old caulk is a recipe for mold growth and adhesion failure.
Use your utility knife to score along both edges of the old bead, then pry it up with your putty knife. For stubborn silicone, a commercial caulk softener can help loosen its grip.
Once the old material is gone, scrub the joint with a stiff brush and wipe it down thoroughly with rubbing alcohol. This removes residual oils, dirt, and moisture, leaving a pristine surface for the new sealant. Let the area dry completely. If you are dealing with large gaps, press a foam backer rod into the joint. The caulk should sit on top of the backer rod, creating a seal that is twice as wide as it is deep.
For more detailed tips on managing this phase without damaging your window frames, read my guide on Don’t Crack Under Pressure Replacing Your Old Window Caulk or consult the expert advice in How to Caulk Around Windows | Family Handyman and How to Reseal Windows: Easy DIY Guide for NJ Homeowners.
Step-by-Step: The Best Way to Caulk Windows Like a Pro
Now that your surfaces are clean, dry, and prepped, it is time to apply the new sealant. Follow this step-by-step sequence to get clean lines and a watertight seal.

Preparing the Tube for the Best Way to Caulk Windows
Using a utility knife, cut the plastic nozzle of your caulk tube at a 45-degree angle.
The trick here is to cut close to the tip. You want the opening to be relatively small — about 3/16 of an inch, or roughly the width of a pencil lead. If the gap you are filling is wider, you can always cut further down to create a larger opening, but starting small gives you maximum control.
Once cut, insert a long nail or the wire puncture tool attached to your caulking gun down the nozzle to pierce the inner foil seal of the tube. Load the tube into your gun and squeeze the trigger until the sealant reaches the tip.
Applying and Smoothing for the Best Way to Caulk Windows
For a flawless finish, especially on interior windows, apply strips of painter’s tape about 1/8 of an inch away from the joint on both the window frame and the wall. This acts as a boundary line, ensuring your caulk bead remains perfectly straight.
Hold the caulking gun at a 45-degree angle to the joint. Start at a corner or the top of the window frame and pull the gun toward you in one continuous, steady motion. Keep your wrist straight and bend at your elbow to maintain a consistent speed. Squeeze the trigger with steady pressure.
Immediately after running a bead, dip your finger in water (for latex caulk) or soapy water (for silicone) and lightly drag it along the bead to smooth it out. This process, known as “tooling,” pushes the sealant deep into the joint and creates a neat, concave shape.
Work in small, 6-inch sections to prevent the caulk from “skinning over” before you can smooth it. Once smoothed, pull the painter’s tape away while the caulk is still wet. Pulling the tape after the caulk dries will tear the edges of your new seal.
For visual demonstrations of this technique, you can watch How to caulk windows inside your home – YouTube or read How to Caulk a Window: Step-by-Step Guide | Lowe’s. If you are focusing on the exterior, check out The Secrets to Great Exterior Caulking(Windows, Doors, Trims)! and How to Properly Caulk an Exterior Window: A Pro’s Trusted Method.
Critical Mistakes: Where NOT to Caulk Around Windows
When homeowners get a caulking gun in their hands, they sometimes get overzealous and start sealing every crack they see. This can lead to serious structural damage. There are several spots around a window frame that are designed to remain open.
- Weep Holes: These are small, rectangular slots located at the bottom of the exterior frame on vinyl and metal windows. They are designed to allow water that gets inside the window track to drain out. If you caulk over these weep holes, water will pool inside the frame, eventually rotting your wood framing, ruining your drywall, and encouraging toxic mold growth.
- Movable Parts: Never apply sealant to the sash, tracks, or any moving parts of the window. Doing so will seal your window shut, rendering it useless and creating a major safety hazard in the event of a fire.
- Modern Exterior Window Trim: On many modern homes with vinyl or fiber cement siding, the trim above the window is designed to redirect water away from the opening using metal flashing. Caulking this top joint can trap moisture behind the siding.
Lifespan, Maintenance, and When to Call a Professional
Exterior window caulk is constantly under attack from UV exposure, moisture, and extreme temperature swings. In our service areas — from the freezing winds of Westchester winters to the humid summers of Long Island and New Jersey — you can expect high-quality exterior caulk to last about 5 years before it needs attention.
I highly recommend performing a quick visual inspection of your window seals every year in the early fall. Look for signs of shrinkage, cracking, or areas where the sealant has pulled away from the frame. Catching these gaps early prevents winter drafts and stops water from penetrating your building envelope.
While sealing a ground-floor window is a straightforward DIY project, there are times when you should leave the job to professionals:
- Heights and Safety: If your home or commercial property has multi-story windows, do not risk climbing high ladders. Professional building maintenance crews have the safety harnesses, scaffolding, and training to handle high-rise work safely.
- Extensive Water Damage: If you notice soft drywall, peeling interior paint, or wood rot around your windows, the water intrusion may have already compromised your structural framing. A professional inspection is required to assess the damage.
- High-Rise and Commercial Properties: Large commercial buildings in NYC require specialized, industrial-grade sealants and rigging equipment to ensure compliance with local safety codes.
At City High Rise Window Cleaning, we bring over 30 years of experience, a 100% customer satisfaction guarantee, and a rigorous commitment to safety to every project. Whether you need residential estate maintenance or commercial facade care, we are here to help. Explore our Window Caulking and Facade Restoration Services or learn about our Professional Window Restoration Services to see how we keep properties across New York, New Jersey, and Long Island protected. For more information on exterior maintenance limits, read Caulking Outside Windows in 2026: Tips, Limits & Fixes.
Frequently Asked Questions About Window Caulking
How long does window caulk take to cure?
Most high-quality exterior silicone and polyurethane sealants are touch-dry within a few hours, but they require 24 to 48 hours to fully cure. Avoid applying caulk if rain is expected within 24 hours, and try to work when temperatures are between 40°F and 80°F. Latex caulks may dry faster but still benefit from a full day of curing before being exposed to moisture or painted.
Can I caulk over old caulk?
No, you should never apply new caulk over old caulk. The new sealant will not adhere properly to the degraded surface of the old material, leading to gaps, peeling, and potential mold growth trapped underneath. Always scrape the joint clean down to the original frame and wipe it with rubbing alcohol before applying a new bead.
Will caulking windows stop condensation between glass panes?
No. Condensation or fogging between the glass panes of a double or triple-pane window indicates that the factory-installed insulated glass unit (IGU) seal has failed. This allows the insulating argon gas to escape and moisture to enter. External caulking around the window frame will not fix this issue; you will need professional window glass restoration or replacement.
Conclusion
Taking the time to learn the best way to caulk windows is one of the smartest, most cost-effective home maintenance steps you can take. By sealing those tiny gaps around your window frames, you can stop uncomfortable drafts, protect your walls from hidden water damage, and enjoy lower energy bills year-round.
For the ground-floor windows of your home, a quick trip to the hardware store and a little patience are all it takes to achieve a professional-looking finish. But when the job involves high-rise windows, complex commercial facades, or structural water damage, you need an experienced hand.
City High Rise Window Cleaning has spent more than three decades providing premier window care, power washing, and restoration services throughout New York City, Long Island, New Jersey, and Westchester. Backed by our 100% customer satisfaction guarantee and an uncompromising commitment to safety, we make sure your property’s exterior is beautiful, efficient, and completely watertight.


