

How to Caulk Windows Correctly Without Mistakes
Window Caulking NYC & NJ: Stop Leaks, Cut Drafts 25%, Fair Pricing, 48‑Hour Scheduling
Window caulking is the process of sealing gaps and joints around window frames with a waterproof compound to prevent air leaks, moisture intrusion, and energy loss. Here’s what you need to know:
Quick Answer: Window Caulking Essentials
- What it does: Creates an airtight seal between your window frame and wall, blocking air, water, and pests
- Energy impact: Up to 25% of your home’s heat escapes through air leakscaulking stops that
- Best materials: Silicone caulk (lasts 20+ years), polyurethane (10-20 years), or siliconized latex for exterior use
- Ideal conditions: Apply when temperature is 40 F-90 0F and no rain expected for 24+ hours
- Replacement schedule: Inspect yearly, replace every 5-10 years or when you see cracks, peeling, or drafts
Window caulking isn’t just about keeping your building looking clean. It’s about protecting your investment. When caulk fails, water seeps into walls causing rot and mold. Cold air rushes in through gaps the size of a basketball combined. Your heating bills spike. Your windows rattle in the wind.
The numbers tell the story: according to the U.S. Department of Energy, heating accounts for a significant portion of annual energy costs, and proper caulking directly addresses that expense. One correctly applied bead of caulk can last over two decades if you choose silicone, or 10-20 years with polyurethanebut only if you do it right.
The reality: Most window caulking jobs fail within a few years because of five common mistakesapplying over old caulk, choosing the wrong material, skipping surface prep, using too much product, and not smoothing the bead properly. This guide eliminates those mistakes with a proven step-by-step process used by professionals on high-rise buildings throughout New York and New Jersey.
I’m Brett Hochman, and I’ve been maintaining building exteriors in the NYC metro area since 1977. After 48 years of hands-on window caulking on everything from brownstones to skyscrapers, I’ve seen every possible failureand perfected the techniques that prevent them.
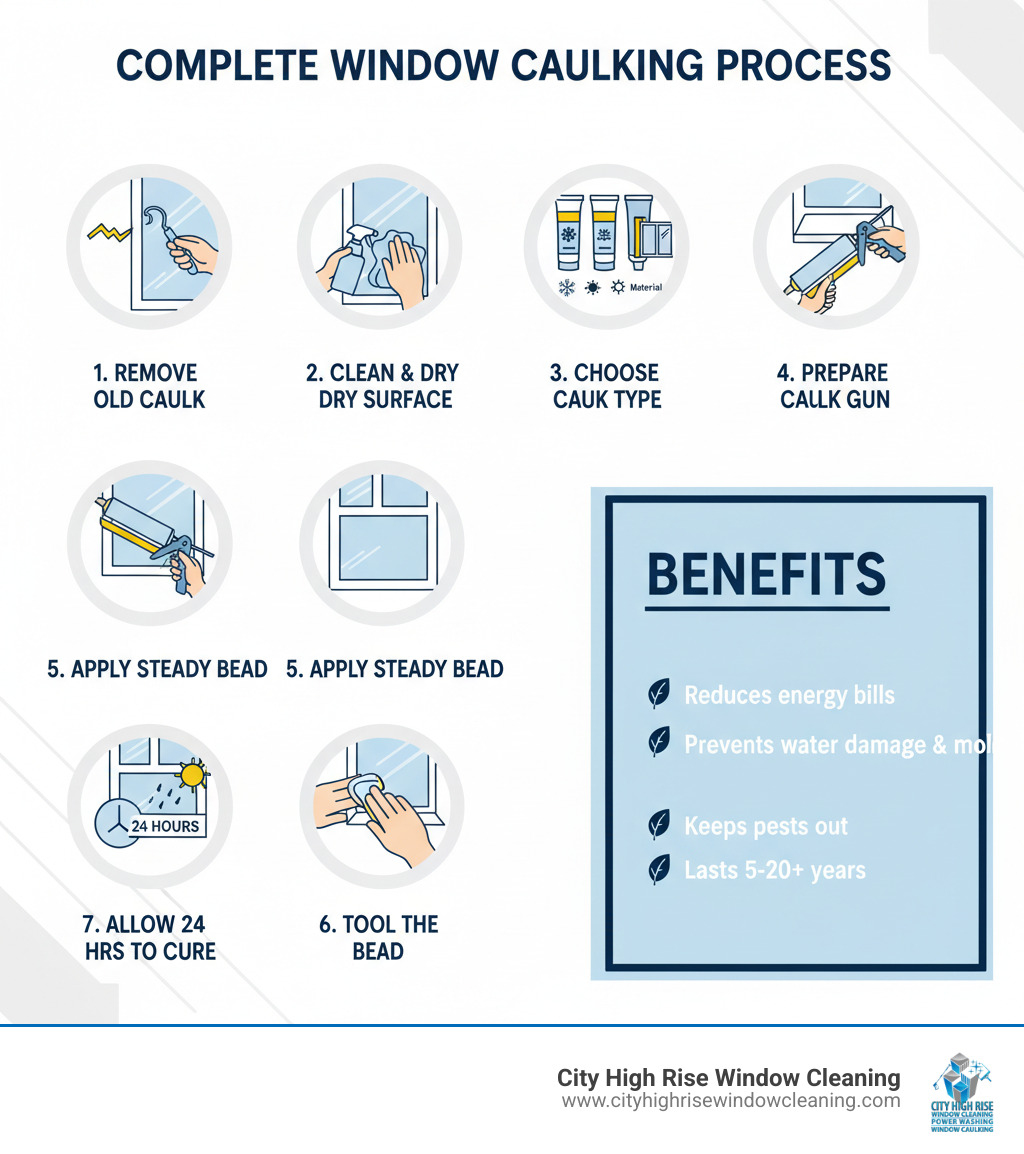
When I talk about window caulking, I’m not just talking about aesthetics. I’m talking about your home’s first line of defense against the elements. A flawless seal around your windows is critical for:
- Energy efficiency: Believe it or not, up to 25% of your homes heat can escape through air leaks, costing you a fortune on your annual electricity bill. All together, these air leaks could amount to a hole the size of a basketball! Proper window caulking seals these gaps, keeping your conditioned air inside where it belongs, and your energy bills lower.
- Water damage prevention: Unsealed gaps are open invitations for rain and moisture to seep into your walls, leading to wood rot, mold growth, and structural damage. My experience has taught me that preventing water intrusion is paramount to maintaining a building’s integrity.
- Pest control: Small gaps are perfect entry points for insects and other unwelcome critters. A tight caulk seal keeps them out, protecting your home and your peace of mind.
Effective window caulking protects your property, improves indoor comfort, and can even increase your home’s value. It’s a small effort with a massive payoff, and when done correctly, a professional window caulking job is an investment that pays for itself.
Choosing Your Weapon: Selecting the Right Caulk and Tools
Walk into any hardware store and you’ll face a wall of caulk tubesdozens of brands, colors, and formulas. It’s overwhelming. But here’s the truth: choosing the right caulk for window caulking isn’t complicated once you understand three basic types and what they’re actually good for.
I’ve spent decades fixing caulk failuresa common issue we cover in our exterior building maintenance guideand most of them trace back to one simple mistake: someone grabbed the wrong tube. Use interior caulk on an exterior window? It’ll fail within a year. Apply latex where you needed silicone? You’ll be redoing the job before you know it.
Think of it like choosing the right tool. You wouldn’t use a screwdriver to hammer a nail. The same logic applies to caulk.
Understanding Caulk Types: Silicone vs. Polyurethane vs. Latex
Silicone caulk is the workhorse of exterior window caulking. It’s incredibly durablelasting 20+ years in harsh weatherand stays flexible even when temperatures swing from freezing winters to scorching summers. The downside? You can’t paint over it, and it costs more upfront. But for exterior windows exposed to New York winters and New Jersey humidity, it’s worth every penny. I’ve seen silicone seals on high-rise buildings perform flawlessly for over two decades.
Polyurethane caulk sits in the middle. It offers excellent adhesion and flexibility, lasting 10-20 years, and you can paint it once it cures. It’s my go-to for windows that need both weather resistance and a finished look. Polyurethane handles movement wellcritical for windows that expand and contract with temperature changes. The catch is it’s trickier to apply smoothly and requires more skill to tool properly.
Acrylic latex caulk is the budget-friendly option, and it has its placemostly indoors. It’s easy to apply, cleans up with water, and you can paint it immediately. But it doesn’t last as long (typically 5-10 years) and doesn’t handle extreme weather or constant moisture well. For interior window caulking where you need a paintable finish and won’t face harsh elements, latex works fine.
Here’s how they stack up:
| Caulk Type | Durability | Flexibility | Paintability | Best Use |
|---|---|---|---|---|
| Silicone | 20+ years | Excellent | No | Exterior windows, high-moisture areas, extreme weather exposure |
| Polyurethane | 10-20 years | Very Good | Yes | Exterior windows needing paint, areas with moderate movement |
| Acrylic Latex | 5-10 years | Fair | Yes | Interior windows, low-moisture areas, budget projects |
The lifespan of your caulk depends on both the material and the conditions it faces. A silicone seal on a south-facing window in direct sun will outlast latex in a sheltered spot by yearssometimes decades.
Interior vs. Exterior Window Caulking: What’s the Difference?
Exterior caulk requirements are non-negotiable. Your caulk needs UV resistance to prevent breakdown from constant sun exposure. It needs serious waterproofing to handle driving rain, snow, and ice. And in the New York and New Jersey climate, it needs to survive temperature swings from single digits in January to 90 F+ in July without cracking or losing adhesion.
I’ve worked on buildings from Manhattan to Long Island, and I’ve learned this lesson the hard way: cheap exterior caulk is expensive in the long run. When water gets behind failed caulk on a high-rise, the repair costs dwarf what you saved on materials.
Interior caulk requirements focus on different priorities. You want low-VOCs (volatile organic compounds) for better indoor air qualityespecially important in occupied spaces. A paintable finish matters more indoors where aesthetics count. And mold resistance is critical around bathroom windows or any area with high humidity.
For window caulking projects in the harsh Northeast climate, I always recommend silicone for exteriors and either polyurethane or latex for interiors, depending on whether you need to paint. Westchester’s freeze-thaw cycles and New Jersey’s coastal humidity demand materials that can handle punishment.
Essential Tools for a Professional Job
You can have the perfect caulk and still end up with a mess if you don’t have the right tools. Here’s what you actually need:
- Dripless caulking gun Stops the caulk from oozing out when you release pressure, giving you control over every bead
- Caulk removal tool A specialized scraper that removes old caulk cleanly without damaging the window frame
- Utility knife For cutting the tube tip and scraping stubborn old caulk
- Painter’s tape Creates perfectly straight lines and protects surfaces from smears
- Backer rod Foam rope that fills large gaps before caulking, preventing waste and improving adhesion
- Cleaning supplies Rubbing alcohol, rags, and a stiff brush for surface prep
A quality caulking gun makes the difference between a smooth, professional bead and a frustrating mess. I’ve seen too many DIY jobs fail because someone used a $3 gun that couldn’t maintain steady pressure.
For complex exterior workespecially on high-rise buildingsprofessional equipment and safety gear become essential. Our facade restoration services include comprehensive window caulking using commercial-grade tools and materials that aren’t available at typical hardware stores.
The right combination of caulk type and proper tools sets you up for success. Skip either one, and you’re gambling with your time and your building’s protection.
If your project involves damaged frames or glass, explore our window restoration. Managing multi-unit or tower properties? See our commercial high rise window cleaning solutions for NYC, Long Island, Westchester, and New Jersey. Related read: 7 Signs Your Window Caulking Is Failing (2025).
FAQs: Window Caulking in New York & New Jersey [2025]
How long does exterior window caulking last in NYC/NJ?
Most silicone jobs last 15–25 years; polyurethane lasts 10–20. Coastal NJ or south-facing NYC exposures may shorten that by a few years.
How much does professional window caulking cost per window?
Typically $12–$35 per linear foot, or $150–$400 per standard residential window depending on access, height, and prep required.
Silicone vs. polyurethane: which should I use outside?
Silicone for maximum longevity and weather resistance; polyurethane if you need a paintable finish. Both perform well in freeze–thaw.
How do I know my window caulking failed?
Look for cracks, gaps, peeling, drafts, water stains, or mildew around frames—especially after heavy rain or windy days.
Can you caulk windows in cold weather?
Yes—down to about 40 F with cold-weather formulas. In NYC/NJ winters, dry surfaces and wind protection are critical for proper cure.
Ready for a free quote? City High Rise Window Cleaning offers 24/7 live consultation. Call 917-749-8342 to speak to a live representative.


